Wednesday, August 29, 2012
Waking Up From a Long Nap....
Wow, it's been a long time! Over 2 years since the last post... and yeah, the Baby is still in the garage right where I left it. OK, it *is* going to come into the house this fall, and get finished! Stay tuned....
Tuesday, June 1, 2010
Two Modifications and a Fix
I managed to make some progress on the M3 this weekend.
First, what I didn't do: the organ is still in my garage. The plan is still to move it into the basement in the next week or two.
Now, on to what I did accomplish:
1) Added carrying handles I had bought a couple folding metal "chest" handles at Lowes back when I purchased the casters for the organ dollie. I've gone back and forth on the idea of installing them on the sides of my M3. I finally decided the cabinet of the organ is nowhere near mint, so drilling some holes and bolting some handles on that will make picking the organ up easier wasn't sacrilege. Here's the end result on one side:

2) Installed the strain relief on the power cord This job wasn't as bad as I thought it was going to be. The strain-relief is two piece, just slips over the cord; then you compress it with a pair of pliers and shove the whole thing into the same shape/sized hole in the amplifier chassis (this amp obviously had one of these before). Here's the procedure:
(1) Slip strain relief over cord, slide second piece over other side of the cord
(2) Squeeze together with pliers and shove it into hole
(3) Swear several times because it isn't going into the hole
(4) Swear again several times because the pliers slipped
(5) Try sweet talking to the strain relief while shoving it into the hole
(6) Swear again several times
(7) Shout in relief as it finally lines-up and slips into the hole!
Now there's no chance of yanking the wires off the amp, or cutting the cord on the side of the chassis.

3) Install jack for new amplifier line-out This one involved drilling a new hole in the chassis. I decided on a 1/8" mono jack because there wasn't a whole lot of room on the chassis where I wanted it to go. I used the "temporary" cap I installed a couple weeks ago and wired it up to the new jack. I'm going to write this up in more detail in a future post, because a lot of folks try to use the "phono input" RCA jack that is located on the expression pedal housing as a line-out. This works, but the signal level is low at that point. My pick-off point is 1 amplification stage later than that factory jack.
What's left to do: I need to install the fuse holder, but I needed a 1/2" drill to make the hole for it near the power cord. Bought a drill bit on the way home tonight but didn't have time to do the job tonight. Then I need to fasten the chassis back down to the bottom of the organ cabinet, and remove the tubes to get ready for moving day.
Future projects: Once it's installed in the basement, I want to see if the power amplifer section of the AO-29 amp is still working. If so, I am going to remove the old 1/4" line out modification the previous owner installed, and install a transformer DI box in it's place with a balanced output for mixers/recording. I have several nice Jensen transformers of the type used for DI boxes so this will be a cheap and very useful modification.
After that, I'm going to consider re-capping the vibrato delay line. Maybe re-capping the tone generator, too. One of the drawbars (16') for the lower manual isn't working too well, so that will need some service. That might involve some major disassembly of the manuals so I might dive into a general cleaning/tune-up of all the drawbars and keys. That's also a job I might put off for awhile!
First, what I didn't do: the organ is still in my garage. The plan is still to move it into the basement in the next week or two.
Now, on to what I did accomplish:
1) Added carrying handles I had bought a couple folding metal "chest" handles at Lowes back when I purchased the casters for the organ dollie. I've gone back and forth on the idea of installing them on the sides of my M3. I finally decided the cabinet of the organ is nowhere near mint, so drilling some holes and bolting some handles on that will make picking the organ up easier wasn't sacrilege. Here's the end result on one side:


2) Installed the strain relief on the power cord This job wasn't as bad as I thought it was going to be. The strain-relief is two piece, just slips over the cord; then you compress it with a pair of pliers and shove the whole thing into the same shape/sized hole in the amplifier chassis (this amp obviously had one of these before). Here's the procedure:
(1) Slip strain relief over cord, slide second piece over other side of the cord
(2) Squeeze together with pliers and shove it into hole
(3) Swear several times because it isn't going into the hole
(4) Swear again several times because the pliers slipped
(5) Try sweet talking to the strain relief while shoving it into the hole
(6) Swear again several times
(7) Shout in relief as it finally lines-up and slips into the hole!
Now there's no chance of yanking the wires off the amp, or cutting the cord on the side of the chassis.

3) Install jack for new amplifier line-out This one involved drilling a new hole in the chassis. I decided on a 1/8" mono jack because there wasn't a whole lot of room on the chassis where I wanted it to go. I used the "temporary" cap I installed a couple weeks ago and wired it up to the new jack. I'm going to write this up in more detail in a future post, because a lot of folks try to use the "phono input" RCA jack that is located on the expression pedal housing as a line-out. This works, but the signal level is low at that point. My pick-off point is 1 amplification stage later than that factory jack.
What's left to do: I need to install the fuse holder, but I needed a 1/2" drill to make the hole for it near the power cord. Bought a drill bit on the way home tonight but didn't have time to do the job tonight. Then I need to fasten the chassis back down to the bottom of the organ cabinet, and remove the tubes to get ready for moving day.
Future projects: Once it's installed in the basement, I want to see if the power amplifer section of the AO-29 amp is still working. If so, I am going to remove the old 1/4" line out modification the previous owner installed, and install a transformer DI box in it's place with a balanced output for mixers/recording. I have several nice Jensen transformers of the type used for DI boxes so this will be a cheap and very useful modification.
After that, I'm going to consider re-capping the vibrato delay line. Maybe re-capping the tone generator, too. One of the drawbars (16') for the lower manual isn't working too well, so that will need some service. That might involve some major disassembly of the manuals so I might dive into a general cleaning/tune-up of all the drawbars and keys. That's also a job I might put off for awhile!
Wednesday, May 26, 2010
Slacking
OK, I could blame it on the sudden run of summer weather... or the chores around the house... or the high temps in the garage. But the unvarnished truth is I've been slacking-off on the M3 over the last week or two. Yeah, all those things above are factors, but it's time to put the nose to the grindstone on this project.
So, this weekend is moving weekend - I'm going to move the organ into my basement. It will be easier to work on down there, not to mention cooler, too. The garage is getting quite warm these days (into the 90's). I got a combination power cord grommet and stress-relief plug from my friend Joe (thanks Joe!) that will go in, along with the new fuse holder and a 1/8" mono jack for my line out. I'm going with 1/8" rather than the more standard 1/4" because there is limited room on the amp chassis to add a jack.
I may also be buying a used Peavey KB-60 keyboard amp from Daddy's Junky Music. It should be in at the local store in a few days. If it looks and works good, it will be a better amplifier solution than the Carvin bass combo I'm currently using. The Peavey has a 12" woofer and a horn tweeter and features 2 separate input channels, and a headphone output for silent practice.
So we'll see how this all goes and hopefully I'll have a lot of news to share here on babyb3 after the weekend!
Wednesday, May 19, 2010
Bringing Back Baby - Links Edition
It's been a busy week here... not much time to work on the Baby.
Here's a few Hammond/Hammond-related links I've found interesting:
"Hammond M3 vs. B3" - A YouTube overview of the similarities and differences between the M3 and the B3... unfortunately they guy uses a Nord Electro for the "B3" but it's still a good overview.
"Hammond M3 with Wah and Boss RT-20" - If you can't afford a real Leslie, the Boss RT-20 simulator isn't half-bad!
"The Ventilator" - A fantastic Leslie simulator pedal made in Germany... gets rave reviews (and costs $500 too)... still cheaper than a new 122A ($3200)!! Company website here.
"John Lord's Hammond Sound" - Deep Purple organist John Lord talks about how he got his signature overdriven, over-the-top sound.
That's it for now, enjoy! And I will get back into the organ this weekend, I promise!
Thursday, May 13, 2010
Amplifier Progress Update
As I mentioned, a new batch of tubes arrived this past Monday, from Electron Tube Enterprises in Maine. ETE is owned and operated by Dick Bergeron, whom I worked with for a few years about 12 years ago. Dick sells NOS (New, Old-Stock) and used vacuum tubes at very reasonable prices. I picked up enough tubes to finish repopulating the amplifier with it's full complement of tubes.

Box of tubes, waiting to be installed

The AO-29 amplifier, with all tubes installed
Tuesday night I put the new tubes into the amp and gave it go. The good news is that the percussion and bass pedals are working! The bad news: there is now some rushing and crackle-y noises in the audio output from the amp. It seems to be worse when the organ is cold, and mostly goes away once the amp is warmed-up. So more work there to chase down the source of the noise. I have also found that the lowest pitch drawbar for the lower manual is somewhat intermittent and touchy. Probably some dirty contacts.
The percussion feature is pretty cool. The addition of percussion makes this a "3" level model, just like it's big sister the B3. Percussion in this case has nothing to do with rhythm - its an extra amplifier stage that adds some harmonic content to the beginning of a note that is played, giving it some extra "pop" or percussive sound. Here's a pretty lame video of me playing around on the organ with and without percussion... remember, I can't actually play keyboard yet so be kind 8):
BabyB3, Late Night Edition
Well it's been a busy week so far... didn't do the "safety" work on the amp this weekend because it was just too damn cold in the garage (snowed a good part of the day on Sunday). Late night at band practice tonight... so no time to do a decent post tonight (it's now 12:22AM as I write this...).
The quick update: more tubes arrived Monday in the mail, so more progress made on Tuesday! Look for a full update tomorrow night. Might have a lead on a strain relief/grommet for the power cord, too.
The quick update: more tubes arrived Monday in the mail, so more progress made on Tuesday! Look for a full update tomorrow night. Might have a lead on a strain relief/grommet for the power cord, too.
Friday, May 7, 2010
Safety, Safety, Safety....
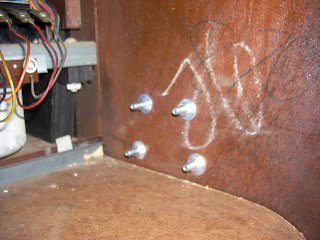
While I'm waiting for another batch of tubes to arrive for the amp, I think I will address a couple electrical safety concerns this weekend. Take a look at this picture, do you see any problems?

OK, well first someone before me installed a 3-wire electrical cord and made a nice solid ground contact to the chassis with the green wire. That's great! But - there's no grommet or strain relief in the hole in the chassis where the power cord enters. The sharp edge of the chassis could eventually cut into the power cord. Also there's no strain relief, nothing to prevent a sharp pull on the cord from damaging the wires where they connect to the solder tabs in the chassis. So I'm going to try to find a grommet to fit the hole, and figure out some way to provide some strain relief.
One more safety item - there is no provision for fusing in the power supply. If something shorts, the only protection is the mains circuit breaker - 20A in the case of my house! That's a lot of current. So I'm going to install a fuse holder next to the line cord inlet in the chassis, with a 3 amp or so fuse installed.
Subscribe to:
Posts (Atom)

